Wednesday, August 3, 2016

Use of Checked and Unchecked keyword in C#


Here I am going to explain what the use of checked and unchecked keyword in C#. Here I am taking the some content from MSDN to explain about it. A checked context, arithmetic overflow raises an exception. In an unchecked context, arithmetic overflow is ignored and the result is truncated.
  • Checked Specify checked context.
  • unchecked Specify unchecked context.
The following operations are affected by the overflow checking:
  • Expressions using the following predefined operators on integral types:
    ++ — - (unary) + - * /
  • Explicit numeric conversions between integral types.
The checked/unchecked compiler option lets you specify checked or unchecked context for all integer arithmetic statements that are not explicitly in the scope of a checked or unchecked keyword. Now I am going to explain one by one.
Checked
The checked keyword is used to control the overflow-checking context for integral-type arithmetic operations and conversions. It can be used as an operator or a statement according to the following forms.

The checked statement:
checked block
The statement block that contains the expressions to be evaluated in a checked context.
The checked operator:
checked (expression)
The expression to be evaluated in a checked context. Notice that the expression must be in parentheses ( ).
Unchecked
The unchecked keyword is used to control the overflow-checking context for integral-type arithmetic operations and conversions. It can be used as an operator or a statement according to the following forms.

The unchecked statement :
unchecked block
The statement block that contains the expressions to be evaluated in an unchecked context.

The unchecked operator :
unchecked (expression)
The expression to be evaluated in an unchecked context. Notice that the expression must be in parentheses ( ).
Example
namespace Checked_Unchecked
{
    class Program
    {
        public short a = 30000;
        public short b = 20000;
        public short c;

        public int Add()
        {
            try
            {
                c = checked((short)(a + b));

            }
            catch (System.OverflowException e)
            {
                System.Console.WriteLine(e.ToString());
            }
            return c;
        }

        public int Mul()
        {
            try
            {
                checked
                {
                    c = (short)(a * b);
                }
            }
            catch (System.OverflowException e)
            {
                System.Console.WriteLine(e.ToString());
            }
            return c;
        }

        public int Add_Unchecked()
        {
            try
            {
                c = unchecked((short)(a + b));

            }
            catch (System.OverflowException e)
            {
                System.Console.WriteLine(e.ToString());
            }
            return c;
        }

        public int Mul_Unchecked()
        {
            try
            {
                unchecked
                {
                    c = (short)(a * b);
                }
            }
            catch (System.OverflowException e)
            {
                System.Console.WriteLine(e.ToString());
            }
            return c;
        }

        static void Main(string[] args)
        {
            Program p = new Program();

            // For checked
            Console.WriteLine("Checked output value is: {0}", p.Add());
            Console.WriteLine("Checked output value is: {0}", p.Mul());
            // For Unchecked
            Console.WriteLine("Checked output value is: {0}", p.Add_Unchecked());
            Console.WriteLine("Checked output value is: {0}", p.Mul_Unchecked());
            Console.ReadKey(true);
        }
    }
}

Output

Image1.jpg

Thursday, July 28, 2016

Making App_GlobalResources -> .RESX public


Regarding the previous post you may want to use strings from a global resources.resx file (App_GlobalResources) as error messages or descriptions in your attributes. This won’t work because global resource files are by default marked as internal and so you can’t access them from your controller or your model. Also the little “Access Modifier” dropdown menu in the resource editor is grayed out, so you can’t change the access level without further ado.

However there’s a way to change the access rights without editing the designer file by hand.
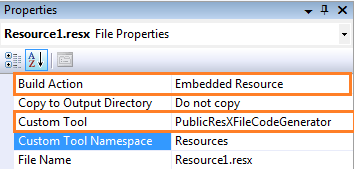
You just have to open the file properties of the resource file and change the “Custom Tool” from “GlobalResourceProxyGenerator” to “PublicResXFileCodeGenerator”, which is the default Tool for local resource files. Next you have to change the “Build Action” to “Embedded Resource”. You may also want to assign a proper Custom Tool Namespace like “Resources” in order to access the file properly, but this isn’t necessary.


Now rebuild the project and you should notice that the resource access is now public and you can access its contents from anywhere in your project.
E.g. like that:


[Required(ErrorMessageResourceType = typeof(Resources.Resource1)
, ErrorMessageResourceName = "Comment_Text")]
public string Myproperty { get; set; }

Solve Cannot retrieve property 'Name' because localization failed. Type 'YourResourceFile' is not public or does not contain a public static string property with the name 'YourItemName'.

Data Annotations are a great thing. They allow you to add information to your model quickly and easily. However, if you have an application that is designed for multiple cultures, you cannot add a Name to your annotation and have it display appropriately for other cultures. It is easy to use App_GlobalResources to hold your global strings, however, you may encounter the following message when using an App_GlobalResources folder in Asp.Net MVC -

        [Required(
            ErrorMessageResourceName = "Required_PleaseSelectA", 
            ErrorMessageResourceType = typeof(StringResources))]
        [StringLength(100, 
            ErrorMessageResourceName = "Length_YourMustBeACombination", 
            ErrorMessageResourceType = typeof(StringResources), 
            MinimumLength = 6)]
        [Display(
            ResourceType = typeof(LocalizedResources), 
            Name = "CategoryName", 
            Description = "CategoryName")]
        public string CategoryName { get; set; }
Cannot retrieve property 'Name' because localization failed.  Type 'Resources.StringResources' is not public or does not contain a public static string property with the name 'CategoryName'.

In this particular example, I set up resources for a property called CategoryName.
This error is VERY simple to solve. The resource file needs to be made public.
To do this, you will need to change the TYPE of tool used to generate the resource file.

In Asp.Net MVC 4, when you add a App_GlobalResources folder and create a resource file in it, by default the resource file is set up as internal and given theGlobalResourceProxyGenerator as a tool. That internal designation creates a problem for the DisplayAttribute annotation because it checks to see if the ResourceType is visible. In fact, it actually uses Type.IsVisible. This creates a problem because the internal class is NOT visible to it.

Now here is an interesting thing to note. The RequiredAttribute and StringAttributeboth inherit from ValidationAttribute. The DisplayAttribute does NOT. The Required and String Attributes utilize a different mechanism to connect with the resource files. You can see subtle differences when you look at how the items are set up again -

        [Required(
            ErrorMessageResourceName = "Required_PleaseSelectA",
            ErrorMessageResourceType = typeof(StringResources))]
        [StringLength(100,
            ErrorMessageResourceName = "Length_YourMustBeACombination",
            ErrorMessageResourceType = typeof(StringResources),
            MinimumLength = 6)]

        [Display(
            ResourceType = typeof(StringResources),
            Name = "CategoryName",
            Description = "CategoryName")]

        public string CategoryName { get; set; }

Notice that each resource file in the photo of App_GlobalResources above has a .cs file attached to it.When you click on that resource file,  you see that all of the classes are internal. If you change the CustomTool to PublicResXFileCodeGenerator and rebuild your application, you will see the .cs file go from internal to public and your DisplayAttribute will be able to connect with the resource file now. In fact, if you click on the .cs file to open it AND change then go over to properties and change the CustomTool, all of the items in the file will automagically change from internal to public.

The difference between DisplayNameAttribute and MVC 3 new DisplayAttribute


You may already know that ASP.NET MVC 2 introduced the DisplayNameAttribute which is part of the System.ComponentModel namespace. This attribute allowed us to display the name of the customer as the “Customer Name” instead of the actual property name: “Name”.
mvc display name attribute
ASP.NET MVC 3 now supports DisplayAttribute in System.ComponentModel.DataAnnotation namespace. DisplayAttribute is new in .NET 4.
mvc display attribute
So what is the real difference between the “DisplayAttribute”, and the “DisplayNameAttribute”? They serve the same purpose, which is displaying a custom string, however the key difference is in the overloads they provide.
“DisplayAttribute” supports more overloads than the DisplayNameAttribute”.
display attribute param overload
DisplayNameAttribute” only supports a string which is the DisplayName.
display-name-attribute-param
Even though it doesn’t make sense to do so, what happens if we were to specify both attributes?
mvc display & display name attribute
In this situation, the new DisplayAttribute takes precedence over the DisplayNameAttribute. Instead of the “Customer name 2” we should see the “Customer name 1” displayed to the user.
Handing Resources
In some cases, we need the DisplayAttribute to be resource sensitive. For an example, instead of using non-localized resources, we might want to use the standard .NET resource provider to retrieve the localized resources. 
display-attribute
Below is a simple example on how to configure the resources so they can be displayed based on the localization.
resource-handling
image
As we did for the above DisplayAttribute, it is not straightforward to make DisplayNameAttribute to be resource sensitive. DisplayNameAttribute does not support a parameter for ResourceType. In that case, we need to subclass the DisplayNameAttribute and provide our own implementation similar to below.
image
Below is the usage of new sub classed attribute:
image


Wednesday, June 29, 2016

Difference between ROLLUP and CUBE


We can understand the difference between ROLLUP and CUBE with a simple example. Consider we have a table which contains the results of quarterly test of students. In certain cases we need to see the total corresponding to the quarter as well as the students. Here is the sample table
SELECT * INTO #TEMP
FROM
(
    SELECT 'Quarter 1' PERIOD,'Amar' NAME ,97 MARKS
    UNION ALL
    SELECT 'Quarter 1','Ram',88
    UNION ALL
    SELECT 'Quarter 1','Simi',76
    UNION ALL
    SELECT 'Quarter 2','Amar',94
    UNION ALL
    SELECT 'Quarter 2','Ram',82
    UNION ALL
    SELECT 'Quarter 2','Simi',71
    UNION ALL
    SELECT 'Quarter 3' ,'Amar',95
    UNION ALL
    SELECT 'Quarter 3','Ram',83
    UNION ALL
    SELECT 'Quarter 3','Simi',77
    UNION ALL
    SELECT 'Quarter 4' ,'Amar',91
    UNION ALL
    SELECT 'Quarter 4','Ram',84
    UNION ALL
    SELECT 'Quarter 4','Simi',79
)TAB


1. ROLLUP(Can find total for corresponding to one column)

(a) Get total score of each student in all quarters.
SELECT * FROM #TEMP
UNION ALL
SELECT PERIOD,NAME,SUM(MARKS) TOTAL
FROM #TEMP
GROUP BY NAME,PERIOD
WITH ROLLUP
HAVING PERIOD IS NULL AND NAME IS NOT NULL
// Having is used inorder to emit a row that is the total of all totals of each student

Following is the result of (a)

(b) Incase you need to get total score of each quarter
SELECT * FROM #TEMP
UNION ALL
SELECT PERIOD,NAME,SUM(MARKS) TOTAL
FROM #TEMP
GROUP BY PERIOD,NAME
WITH ROLLUP
HAVING PERIOD IS NOT NULL AND NAME IS NULL

Following is the result of (b)

2. CUBE(Find total for Quarter as well as students in a single shot)

SELECT PERIOD,NAME,SUM(MARKS) TOTAL
FROM #TEMP
GROUP BY NAME,PERIOD
WITH CUBE
HAVING PERIOD IS NOT NULL OR NAME IS NOT NULL

Following is the result of CUBE


Now you may be wondering about the real time use of ROLLUP and CUBE. Sometimes we need a report in which we need to see the total of each quarter and total of each student in a single shot. Here is an example
I am changing the above CUBE query slightly as we need total for both totals.
SELECT CASE WHEN PERIOD IS NULL THEN 'TOTAL' ELSE PERIOD END PERIOD,
CASE WHEN NAME IS NULL THEN 'TOTAL' ELSE NAME END NAME,
SUM(MARKS) MARKS
INTO #TEMP2
FROM #TEMP
GROUP BY NAME,PERIOD
WITH CUBE

DECLARE @cols NVARCHAR (MAX)

SELECT @cols = COALESCE (@cols + ',[' + PERIOD + ']',
               '[' + PERIOD + ']')
               FROM    (SELECT DISTINCT PERIOD FROM #TEMP2) PV 
               ORDER BY PERIOD   


DECLARE @query NVARCHAR(MAX)
SET @query = 'SELECT * FROM
             (
                 SELECT * FROM #TEMP2
             ) x
             PIVOT
             (
                 SUM(MARKS)
                 FOR [PERIOD] IN (' + @cols + ')
            ) p;'

EXEC SP_EXECUTESQL @query

Now you will get the following result